In web design, elements sometimes overlap, especially when positioned on top of each other. This is where stacking contexts come in. Think of a stacking context as a “layer” or “stack”. Understanding stacking contexts helps you control how elements overlap.
What Creates a Stacking Context?
Some elements automatically create a new stacking context. Here are some key things that create a new stacking context.
- The
<html>element: The root of every webpage creates the first stacking context. - Positioned elements: Elements with
position: absoluteorposition: relativeand az-indexvalue (other thanauto) create their own stacking context. - Fixed and sticky positioned elements: Elements with
position: fixedorposition: stickyalso create a stacking context. - Elements with certain properties:
opacityless than1(e.g., semi-transparent elements)
Example: The Root Stacking Context
Let's start with a simple example:
<html>
  <head></head>
  <body>
    <p>Hello World</p>
  </body>
</html>
The <html> tag is like a big box that includes everything on your webpage. It’s the first stacking context.

In this image, the <html> stacking context is shown as the blue layer.
Let’s create new stacking context with z-index and position: absolute (No. 2 on the list)
When you create an element with specific properties, like position: absolute; z-index: 1, you add a new stacking context.
<html>
  <body>
    <p>Hello World</p>
    <div style="position: absolute; z-index: 1;">New Stacking Context</div>
  </body>
</html>
In this example, the <div> creates a separate stacking context because it has position: absolute and a z-index value.

In this image, the new stacking context <div> is shown with cyan.
How z-index Works Inside Stacking Contexts
Elements can have different z-index values to control their stacking order relative to each other.
<div style="position: absolute; z-index: 1;">
  <div style="position: absolute; z-index: 999;">Child A</div>
  <div style="position: absolute; z-index: 20;">Child B</div>
</div>
(In this example, Child A will appear at the top of Child B as its z-index order is higher.)

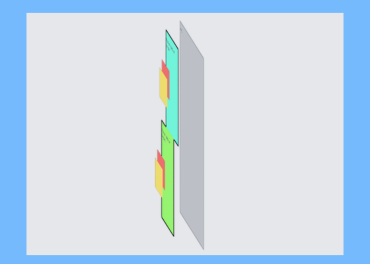
In this image, the Child A is shown with yellow and Child B is shown with red.
But z-index of those children don’t interact with elements in other stacking context. Here’s an example:
<layer-div-1 style="position: absolute; z-index: 1;">
  <div style="position: absolute; z-index: 999;">Child A</div>
</layer-div-1>
<layer-div-2 style="position: absolute; z-index: 2;">
  <div style="position: absolute; z-index: 20;">Child B</div>
</layer-div-2>
In this case:
Child Ahas a highz-indexvalue of 999, but it’s insidelayer-div-1withz-index: 1. So, it can only be arranged within that parent layer. It won’t affectChild Bfromlayer-div-2Child Bis in another stacking context withz-index: 2, meaning it will always appear aboveChild Aand its parent element, regardless ofChild A’sz-index.

In this image, the Child A layer is shown with yellow and Child B layer is shown with red.
This means the z-index of child elements applies only within each layer and won’t affect elements outside of it.
In Summary
Stacking contexts are like invisible containers that control how elements stack (or layer) on top of each other. By understanding when a new stacking context is created, you can better manage how elements overlap and display on your webpage. Use z-index carefully within each stacking context, and remember it only affects elements within the same context!
In the statement above, I mentioned only a few properties, but in fact, these properties can also create a stacking context.
(Directly copied from MDN docs)
- Root element of the document (
<html>). - Element with a
positionvalueabsoluteorrelativeandz-indexvalue other thanauto. - Element with a
positionvaluefixedorsticky(sticky for all mobile browsers, but not older desktop browsers). - Element with a
container-typevaluesizeorinline-sizeset, intended for container queries. - Element that is a child of a flex container, with
z-indexvalue other thanauto. - Element that is a child of a
gridcontainer, withz-indexvalue other thanauto. - Element with an
opacityvalue less than1. - Element with a
mix-blend-modevalue other thannormal. - Element with any of the following properties with value other than
none: - Element with an
isolationvalueisolate. - Element with a
will-changevalue specifying any property that would create a stacking context on non-initial value. - Element with a
containvalue oflayout, orpaint, or a composite value that includes either of them (i.e.contain: strict,contain: content). - Element placed into the top layer and its corresponding
::backdrop. Examples include fullscreen and popover elements. - Element that has had stacking context-creating properties (such as
opacity) animated using@keyframes, withanimation-fill-modeset toforwards.
Preview and Debug Stacking Contexts Directly in Chrome DevTools
To explore and debug stacking contexts in Chrome DevTools, click the three-dot menu and select "Layers".
This tool renders in real-time as you scroll, showing stacking contexts to you.
